instant vortex plus air fryer manual
Instant Vortex Plus Air Fryer⁚ A Comprehensive Guide
This guide covers the Instant Vortex Plus air fryer, offering safety tips, control panel explanations, cooking time adjustments, air frying techniques, and cleaning instructions. It also includes recipes and troubleshooting advice for optimal use and delicious results. User manuals and support resources are readily available online.
Safety Precautions and Initial Setup
Before operating your Instant Vortex Plus Air Fryer, carefully read all instructions in the provided manual. Ensure the appliance is placed on a stable, heat-resistant surface away from flammable materials. Always unplug the air fryer from the power outlet before cleaning or performing any maintenance. Never immerse the air fryer or its electrical components in water or other liquids. Exercise caution when handling hot surfaces; use oven mitts or heat-resistant gloves to prevent burns. Inspect the power cord for any damage before each use; do not use the appliance if the cord is frayed or damaged. Proper ventilation is crucial; ensure adequate space around the air fryer for optimal airflow. Always supervise children in the vicinity of the appliance. The Instant Vortex Plus Air Fryer is designed for household use only; commercial use is prohibited. Familiarize yourself with all safety features and operational procedures before commencing cooking. This will ensure safe and effective use of your air fryer.
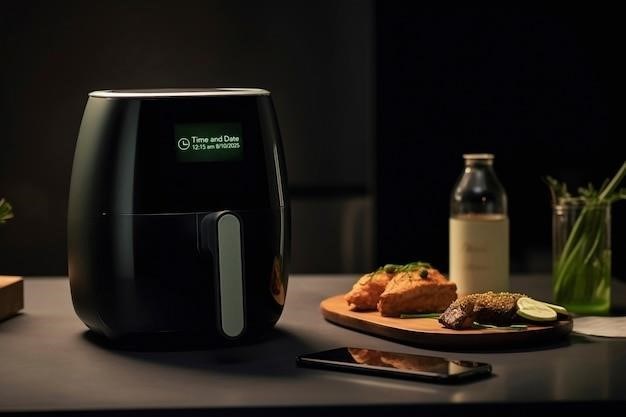
Understanding the Control Panel and Functions
The Instant Vortex Plus Air Fryer features a user-friendly control panel with intuitive controls. A digital display clearly shows the selected temperature and cooking time. Buttons allow you to easily adjust these settings, offering precise control over the cooking process. Various pre-programmed cooking functions simplify operation for different foods. These functions often include settings for air frying, roasting, baking, and reheating. Understanding these settings is key to achieving optimal results; The power button initiates operation, while the preheat function allows for even cooking. The timer enables you to set a specific cooking duration, with an audible alert signaling completion. Navigation through the menu is typically straightforward, with clear on-screen prompts guiding you through the various options. Consult the user manual for detailed explanations of each function and setting. Mastering the control panel will unlock the full potential of your Instant Vortex Plus Air Fryer.
Preheating and Cooking Time Adjustments
Preheating your Instant Vortex Plus Air Fryer is crucial for achieving crispy and evenly cooked results; The preheat function, typically activated via a dedicated button on the control panel, brings the air fryer to the desired temperature before adding food. This ensures consistent heat distribution throughout the cooking process. The recommended preheating time varies depending on the selected temperature and the type of food being prepared; consult your manual for specific guidelines. Accurate cooking time adjustments are equally important. While the manual provides estimated cooking times for various recipes, these may need adjustments based on factors such as food quantity, thickness, and desired level of doneness. Always start with the recommended time and monitor your food closely, making necessary adjustments as needed. Using a food thermometer can help ensure that the food reaches its ideal internal temperature. Experimentation and observation are key to mastering the art of adjusting cooking times in your Instant Vortex Plus Air Fryer to achieve perfect results every time. Remember to always prioritize food safety by ensuring the food is cooked thoroughly.
Air Frying Techniques and Tips
Mastering air frying techniques with your Instant Vortex Plus unlocks a world of crispy, flavorful dishes. Begin by ensuring your food is properly prepped; cutting food into uniform pieces promotes even cooking. Avoid overcrowding the basket; this restricts airflow and leads to uneven results. Arrange food in a single layer, ensuring adequate space between pieces. For optimal crispiness, lightly spray food with oil—a little goes a long way. Experiment with different cooking times and temperatures to achieve your desired level of crispness and doneness. Remember that cooking times may vary depending on the food’s density and thickness. Regularly shake or flip food during the cooking process to ensure even browning and prevent sticking. Don’t be afraid to experiment! Try different seasonings and marinades to enhance the flavor of your air-fried creations. Consult online resources and recipe books for inspiration and innovative cooking methods. With practice, you’ll become an air-frying expert, creating delicious and healthy meals with your Instant Vortex Plus.
Cleaning and Maintenance Procedures
Cleaning your Instant Vortex Plus air fryer after each use is crucial for maintaining its performance and extending its lifespan. Always unplug the appliance and allow it to cool completely before cleaning. Remove the cooking basket and crisper tray; these are often dishwasher-safe, but check the manufacturer’s instructions to confirm. For hand washing, use warm, soapy water and a non-abrasive sponge or cloth. Avoid harsh chemicals or abrasive cleaners that could damage the non-stick coating. Wipe down the interior of the air fryer with a damp cloth, paying attention to any food residue. The exterior can be wiped clean with a damp cloth. Never immerse the main unit in water or other liquids. Regularly inspect the heating element for any food debris; carefully remove any buildup with a soft brush or cloth. Proper cleaning prevents grease buildup and ensures optimal air circulation, leading to better cooking results and a longer-lasting appliance. Remember to always consult your user manual for specific cleaning instructions and recommendations for your Instant Vortex Plus model.

Recipes and Culinary Applications
Unlock the culinary potential of your Instant Vortex Plus! Explore a world of crispy, flavorful dishes – from juicy chicken to perfectly golden fries. Discover countless recipe ideas online and in your user manual for optimal results.
Air Fryer Friendly Recipes
The Instant Vortex Plus excels at creating a wide variety of delicious and healthy meals. Dive into the world of crispy, golden-brown delights with recipes designed specifically for air fryers. Experiment with classic favorites like french fries, onion rings, and chicken wings, achieving restaurant-quality results with ease. Elevate your vegetables to new heights by air frying broccoli, asparagus, or Brussels sprouts for a perfectly tender-crisp texture. Don’t limit yourself to savory dishes; explore the possibilities of sweet treats like air-fried apple slices with cinnamon or even crispy churros. For meat lovers, the Instant Vortex Plus is your secret weapon for creating juicy, perfectly cooked chicken breasts, flavorful pork chops, or tender steaks. The possibilities are endless! Explore online recipe databases and the Instant Pot website for inspiration, and discover new culinary adventures with your Instant Vortex Plus air fryer. Remember to always consult your user manual for specific cooking times and temperatures based on the food type and desired level of crispness. Enjoy the journey of delicious discovery!
Tips for Achieving Optimal Results
Unlock the full potential of your Instant Vortex Plus air fryer with these expert tips. For perfectly crispy results, ensure even food distribution in the basket, avoiding overcrowding. Preheating the air fryer is crucial for achieving that satisfying crunch; allow ample time for the appliance to reach the desired temperature before adding your ingredients. Don’t be afraid to experiment with cooking times and temperatures – slight adjustments can make a big difference. For extra crispy textures, consider lightly spraying your food with oil before air frying. Using parchment paper liners can simplify cleanup and prevent food from sticking to the basket. Regularly check your food during the cooking process, as cooking times may vary depending on the specific ingredients and desired level of doneness. Remember that smaller pieces of food generally cook faster than larger ones. For best results, follow the manufacturer’s instructions and consult online resources for recipe-specific guidance. Explore different cooking functions and settings to discover new culinary possibilities. By paying close attention to detail and embracing experimentation, you’ll master the art of air frying and consistently achieve delectable results with your Instant Vortex Plus.
Troubleshooting Common Issues
Encountering problems with your Instant Vortex Plus? This section addresses common malfunctions, providing solutions and guidance for resolving issues. Consult the manual or online resources for further assistance.
Addressing Malfunctions and Errors
This section details troubleshooting for common Instant Vortex Plus air fryer malfunctions. If your air fryer fails to power on, check the power cord and outlet. A malfunctioning timer might require a reset; consult your user manual for specific instructions. Uneven cooking could result from overcrowding the basket; ensure proper food spacing for optimal heat circulation. If the air fryer is producing unusual noises, check for any obstructions within the unit. Always unplug the appliance before attempting any internal inspection or cleaning. Persistent issues that aren’t addressed by these basic troubleshooting steps should prompt contacting customer support for further guidance. Remember to always consult the provided user manual for detailed instructions specific to your model. The manual will guide you step-by-step through diagnostic procedures to pinpoint the source of the problem before escalating to more advanced troubleshooting techniques. Understanding the error codes displayed on the control panel will help you quickly identify and solve the issue. Remember to never attempt repairs beyond the scope of the user manual; such repairs should be handled by qualified technicians to avoid further damage or safety hazards. Proper maintenance, as described in the cleaning section of your manual, is crucial in preventing malfunctions. Regular cleaning will keep the heating elements free from food residue and ensure optimal performance. By following these guidelines, you can resolve most common malfunctions and keep your Instant Vortex Plus air fryer operating efficiently and safely for years to come.
Customer Support and Resources
For comprehensive assistance with your Instant Vortex Plus air fryer, several resources are available. The user manual provides detailed instructions, safety guidelines, and troubleshooting tips. Should you require further assistance, Instant Brands offers various customer support channels. Their website typically features a comprehensive FAQ section addressing frequently asked questions. You can also access online forums and communities dedicated to Instant Pot and air fryer users, where you can connect with other users and share experiences or troubleshooting tips. Direct contact with customer support can be made through phone, email, or online chat options, depending on the availability provided by Instant Brands. When contacting support, be prepared to provide your model number, purchase date, and a detailed description of the issue you are experiencing. For warranty claims or repair services, refer to the warranty information included with your appliance or available on the manufacturer’s website. Utilizing these combined resources empowers you to efficiently resolve issues, optimize your air fryer’s performance, and maximize your cooking experience. Regularly checking the Instant Brands website for updates, software patches, and new recipe ideas will also enhance your use of the appliance and ensure you are taking full advantage of its features. Remember to always refer to official sources to avoid misinformation.